
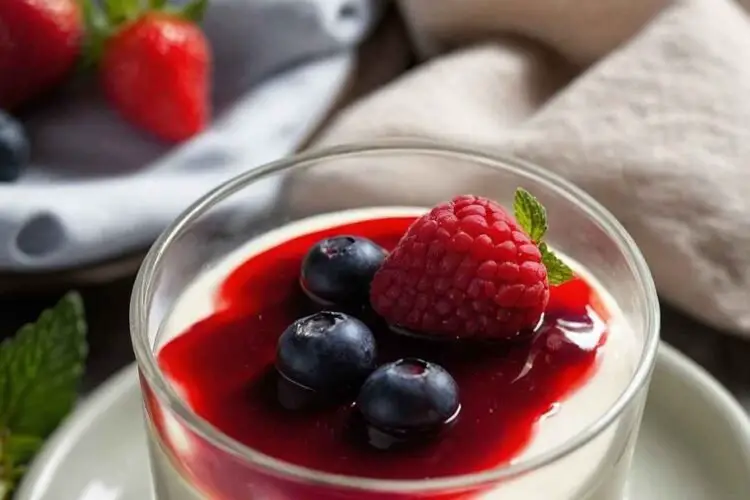
Before diving into the creamy goodness of panna cotta, let’s talk about what brings this delightful dessert to life. A perfect panna cotta pairs beautifully with fresh berries, a dollop of fruit compote, or a drizzle of rich chocolate sauce.
Want to elevate your experience? A light dusting of edible flowers or a sprig of mint adds both beauty and a flavor pop! You could also consider serving it alongside an espresso or a fruity dessert wine. This pairing transforms each bite into a memorable moment.

You’ll Also Like These Recipes
There’s something undeniably charming about panna cotta. It’s elegant but simple, indulgent yet light, and it carries a certain mystique that only Italian desserts seem to possess. I vividly recall my first panna cotta experience. It was at a quaint little trattoria tucked away in Florence, where I was mesmerized by the way the silky dessert glided onto my plate. It felt like an Italian culinary secret unveiled just for me.
Imagine discovering a dessert that’s not only easy to make but also brings a touch of sophistication to any table. Today, I’m excited to share the journey of creating a perfect panna cotta, complete with rich flavor profiles, a special recipe, and tips that I’ve learned through both trial and error in my own kitchen. So, roll up your sleeves and let’s get to it!
What is Perfect Panna Cotta?
In Italian, panna cotta literally means “cooked cream.” This delightful dessert hails from the northern regions of Italy, characterized by its smooth texture and a creamy base made from cream, sugar, and gelatin. It’s typically served chilled and can be garnished with a variety of toppings, ranging from fruits to sauces.
The magic of panna cotta lies in its versatility; it can be flavored with anything from vanilla to coffee, and even citrus. The result is a dessert that melts in your mouth, leaving you with a lingering sense of satisfaction.
What is the Flavor Profile of This Dish?
Panna cotta’s flavor profile is as alluring as its texture. The cream provides a rich, buttery base, while the sugar adds just the right amount of sweetness. A hint of vanilla, whether from paste or extract, introduces an aromatic warmth that’s comforting and nostalgic.
Should you decide to infuse your panna cotta with citrus zest or other flavors, such as coffee or chocolate, additional layers of taste come into play. The inclination towards subtle flavors is what makes panna cotta extraordinary; it’s not overwhelming, allowing each ingredient to harmoniously contribute to the overall experience.
What Makes This Recipe Different from Other Perfect Panna Cotta?
While traditional recipes might stick to the basics, my version incorporates a few tweaks. Using half-and-half alongside heavy cream gives a lighter mouthfeel without sacrificing creaminess. Adding honey instead of granulated sugar enhances the flavor complexity and offers a natural sweetness that balances beautifully with the rich cream.
Plus, the optional twist of orange zest provides a refreshing brightness, making each spoonful feel like a mini celebration. Each aspect has been carefully considered to ensure that the panna cotta not only delights the taste buds but also presents a little surprise with every bite.
Ingredients You’ll Need
To craft the perfect panna cotta, gather the following ingredients:
360 mL heavy cream (or whipping cream)
360 mL half-and-half (or 3% milk)
15 mL pure vanilla bean paste (or vanilla extract, or scraped seeds from 1 vanilla pod)
80 g raw honey (or ⅓ cup / 66 g granulated sugar)
Generous pinch of fine sea salt
1 teaspoon orange zest (optional, adds subtle brightness)
For the Berry Fluid Gel:
200 g fresh berries (recommended mix of raspberries and strawberries)
2 g powdered gelatin (or 1 gold gelatin sheet)
8 mL freshly squeezed lemon juice
Pinch of fine salt
40 g wildflower honey
1 teaspoon finely chopped fresh mint (optional, for a refreshing note)
To Bloom the Gelatin:
7 g Knox powdered gelatin or 4 gold gelatin sheets (8.4 g)
45 mL cold water (for powdered gelatin)

Step-by-Step Directions
Step 1: Blooming the Gelatin
Start by blooming the gelatin. If you’re using powdered gelatin, sprinkle it over 45 mL of cold water. Let it sit for about five minutes until it becomes thick and gelatinous. For sheets, soak them in cold water for approximately 5-10 minutes until they’re soft. This step is crucial as it helps the gelatin dissolve properly when heated.
Step 2: Preparing the Cream Mixture
In a medium saucepan, combine 360 mL of heavy cream and 360 mL of half-and-half. Place this mixture over medium heat and stir in 80 g of honey. Remember to add a generous pinch of fine sea salt for balance. Heat the mixture until it’s warm, but do not let it boil. As it heats, the honey will dissolve and the cream will begin to release its beautiful scent.
Step 3: Adding the Flavor
Once the cream is warm, remove the saucepan from the heat. Stir in 15 mL of pure vanilla bean paste (or your chosen vanilla alternative). This is where the magic begins. Mix in the orange zest, if using, for an added touch of brightness. Allow the mixture to cool slightly before adding your bloomed gelatin.
Step 4: Mixing in the Gelatin
If you used powdered gelatin, add the mixture directly to the warm cream while stirring constantly to ensure even distribution. If you used gelatin sheets, first squeeze out the excess water and then add the sheets to your warm cream mixture, stirring until fully dissolved.
Step 5: Pouring into Molds
Once fully combined, it’s time to pour your creamy mixture into molds. Silicone molds work wonderfully because they allow for easy removal later. I often opt for small ramekins or clear glasses to show off the smooth texture. Cover the molds with plastic wrap and put them in the refrigerator. Allow them to chill for at least four hours, preferably overnight.
Step 6: Making the Berry Fluid Gel
For a fresh twist on your panna cotta, it’s time to prepare the berry fluid gel. Start by blending 200 g of fresh berries in a food processor until smooth. In a small saucepan, heat the blended berries and 8 mL of freshly squeezed lemon juice. Stir in a pinch of fine salt and 40 g of honey.
Meanwhile, bloom your gelatin again, as in the first step, and then stir it into the warm berry mixture, ensuring it’s fully dissolved. Let this mixture cool to room temperature.
Step 7: Assembling the Dessert
Once the panna cotta has set, it’s time to assemble your delightful dessert. Carefully invert the molds onto dessert plates to release the panna cotta. Drizzle the berry fluid gel over the top, and if you feel adventurous, sprinkle some chopped mint for a pop of brightness.
Tips on Making Perfect Panna Cotta
Choose Quality Ingredients: Use high-quality cream and fresh vanilla. This impacts the flavor significantly.
Temperature Matters: Heat the cream gently. If it boils, it might alter the texture.
Let It Chill: Patience is key! Allow sufficient chilling time for a properly set dessert.
Experiment with Flavors: Don’t be afraid to try flavors like espresso, lavender, or coconut for a twist.
Don’t Skip the Salt: A pinch of salt enhances sweetness and balances the flavors brilliantly.
Nutrition Information
For a typical serving (1/6 of the recipe), the nutrition breakdown is roughly:
Calories: 210
Protein: 2g
Fat: 13g
Carbohydrates: 20g
Sugar: 13g
Fiber: 0g
Keep in mind that these values can vary depending on ingredient brands and specific measurements.
How Can I Store This Perfect Panna Cotta?
Once your panna cotta is fully set, store it in the refrigerator for up to four days. Make sure to cover it with plastic wrap to prevent any odors from the fridge affecting its flavor. If you’ve made gel toppings, store them separately. For the best taste and texture, consume within the first couple of days.

Ingredient Substitutions
If you find yourself a little short on supplies, fear not! Here are some swaps you can try:
Heavy Cream: Greek yogurt or coconut cream can provide creaminess with a different flavor profile. Just be mindful of adjusting sugar content.
Honey: Use maple syrup or agave nectar as alternatives for a vegan version while retaining sweetness.
Gelatin: If you’re vegan, consider using agar-agar, which can be a fantastic substitute for traditional gelatin (note: it requires different handling than gelatin).
Vanilla Bean Paste: You can substitute with vanilla extract. Use about 5 mL for a milder flavor.

Panna Cotta
Equipment
- saucepan
Ingredients
- 360 mL heavy cream or whipping cream
- 360 mL half-and-half or 3% milk
- 15 mL pure vanilla bean paste or vanilla extract, or scraped seeds from 1 vanilla pod
- 80 g raw honey or ⅓ cup / 66 g granulated sugar
- Generous pinch of fine sea salt
- 1 teaspoon orange zest optional, adds subtle brightness
For the Berry Fluid Gel:
- 200 g fresh berries recommended mix of raspberries and strawberries
- 2 g powdered gelatin or 1 gold gelatin sheet
- 8 mL freshly squeezed lemon juice
- Pinch of fine salt
- 40 g wildflower honey
- 1 teaspoon finely chopped fresh mint optional, for a refreshing note
To Bloom the Gelatin:
- 7 g Knox powdered gelatin or 4 gold gelatin sheets 8.4 g
- 45 mL cold water for powdered gelatin
Instructions
Step 1: Blooming the Gelatin
- Start by blooming the gelatin. If you’re using powdered gelatin, sprinkle it over 45 mL of cold water. Let it sit for about five minutes until it becomes thick and gelatinous. For sheets, soak them in cold water for approximately 5-10 minutes until they’re soft. This step is crucial as it helps the gelatin dissolve properly when heated.
Step 2: Preparing the Cream Mixture
- In a medium saucepan, combine 360 mL of heavy cream and 360 mL of half-and-half. Place this mixture over medium heat and stir in 80 g of honey. Remember to add a generous pinch of fine sea salt for balance. Heat the mixture until it’s warm, but do not let it boil. As it heats, the honey will dissolve and the cream will begin to release its beautiful scent.
Step 3: Adding the Flavor
- Once the cream is warm, remove the saucepan from the heat. Stir in 15 mL of pure vanilla bean paste (or your chosen vanilla alternative). This is where the magic begins. Mix in the orange zest, if using, for an added touch of brightness. Allow the mixture to cool slightly before adding your bloomed gelatin.
Step 4: Mixing in the Gelatin
- If you used powdered gelatin, add the mixture directly to the warm cream while stirring constantly to ensure even distribution. If you used gelatin sheets, first squeeze out the excess water and then add the sheets to your warm cream mixture, stirring until fully dissolved.
Step 5: Pouring into Molds
- Once fully combined, it’s time to pour your creamy mixture into molds. Silicone molds work wonderfully because they allow for easy removal later. I often opt for small ramekins or clear glasses to show off the smooth texture. Cover the molds with plastic wrap and put them in the refrigerator. Allow them to chill for at least four hours, preferably overnight.
Step 6: Making the Berry Fluid Gel
- For a fresh twist on your panna cotta, it’s time to prepare the berry fluid gel. Start by blending 200 g of fresh berries in a food processor until smooth. In a small saucepan, heat the blended berries and 8 mL of freshly squeezed lemon juice. Stir in a pinch of fine salt and 40 g of honey.
- Meanwhile, bloom your gelatin again, as in the first step, and then stir it into the warm berry mixture, ensuring it’s fully dissolved. Let this mixture cool to room temperature.
Step 7: Assembling the Dessert
- Once the panna cotta has set, it’s time to assemble your delightful dessert. Carefully invert the molds onto dessert plates to release the panna cotta. Drizzle the berry fluid gel over the top, and if you feel adventurous, sprinkle some chopped mint for a pop of brightness.
Notes
Temperature Matters: Heat the cream gently. If it boils, it might alter the texture.
Let It Chill: Patience is key! Allow sufficient chilling time for a properly set dessert.
Experiment with Flavors: Don’t be afraid to try flavors like espresso, lavender, or coconut for a twist.
Don’t Skip the Salt: A pinch of salt enhances sweetness and balances the flavors brilliantly.
Nutrition
Frequently Asked Questions
Can I make panna cotta ahead of time?
Absolutely! Panna cotta is perfect for making ahead. Store it covered in the fridge for up to four days.
Why did my panna cotta not set?
This could be due to insufficient gelatin or not allowing enough chill time. Ensure you measure accurately and give it adequate time to firm up.
Can I add fruit directly to the panna cotta?
It’s better to serve fruits as a topping or make a fluid gel. Directly adding fruit can affect the setting.
How can I make a dairy-free panna cotta?
Use coconut cream or almond milk in place of dairy. Substitute gelatin with agar-agar for a fully vegan version.
What’s the best way to serve panna cotta?
Serve it in elegant dishes. Consider topping it with a berry sauce, chocolate drizzle, or edible flowers for a stunning presentation.
Conclusion
Perfect panna cotta is more than just a dessert; it’s an experience. Each bite transports you to a charming Italian eatery, evoking warmth, comfort, and nostalgia. Creating this dish not only impresses your guests but also gifts you an opportunity to experiment with flavors and textures.
Whether you’re a seasoned chef or a kitchen novice, panna cotta can be your canvas. So, gather your ingredients and unleash your inner Italian chef—your taste buds are in for a treat!