
Ah, strawberry jam! It brings back memories of summer picnics and lazy Sunday breakfasts. Whether it’s spread over a warm biscuit or drizzled on pancakes, there’s something irresistibly delightful about it. But, to be honest, I didn’t just come here to reminisce; I’m here to help you make some fabulous strawberry jam yourself!
What to Pair with Strawberry Jam
Before we dive into the delicious details of making strawberry jam, let’s talk about the delightful ways you can enjoy it. Picture this: a slice of freshly baked bread slathered with butter and topped with a generous spoonful of homemade strawberry jam. Heaven, right? Not only that, but you can also top your morning yogurt with it, or mix a dollop into a smoothie for a fruity twist.
If you’re feeling adventurous, try it on pancakes or waffles. It’s great on cheesecakes as a topping, or even swirled into oatmeal for a sweet breakfast treat. You may find that it makes a wonderful addition to desserts too. Cheesecakes, tarts, and custards can all be elevated with a touch of this jam. So, gather your ingredients, and let’s get cooking!

You Might Also Like These Recipes!
Why This Recipe is Great for You
This strawberry jam recipe is not just simple; it’s also packed with flavor and freshness. I’ve crafted this recipe to ensure that anyone can replicate it at home without stress. And let’s be real—the ingredients are both accessible and straightforward. With summer strawberries, a bit of sugar, fresh lemon juice, and a hint of vanilla, you’ll have a jar of joy in no time.
Having made a few batches myself, I can assure you that this recipe captures the essence of strawberries beautifully. The vibrant sweetness of ripe strawberries combined with a slight tang of lemon juice creates a balanced flavor profile that’s not overly sweet.
I’ve Tried These Ingredients
1. Fresh Strawberries: The star of this recipe! Picking ripe strawberries is key. I often find myself wandering through farmers’ markets, picking out the reddest, juiciest strawberries I can find. Trust me, the fresher the strawberries, the more vibrant your jam will be.
2. Sugar: Though some may shy away from sugar, it helps in transforming those luscious strawberries into a beautifully textured jam. I use fine cane sugar, which dissolves quickly and evenly, making the process easier.
3. Lemon Juice and Zest: The acidity from lemon juice balances the sweetness of the strawberries. It brightens the flavor, and zest adds a lovely aromatic quality.
4. Vanilla Extract: This is my secret weapon. It enhances the flavor, making the jam taste more complex and luxurious.
Ingredients List
Let’s get to the specifics. Here’s what you’ll need for this fantastic strawberry jam recipe:
2 lbs (900g) fresh strawberries, hulled and sliced in halves
1¼ cups (250g) fine cane sugar
1½ tbsp (22mL) fresh lemon juice
½ tbsp (8mL) pure vanilla extract
1 tsp lemon zest
How to Make Strawberry Jam
So, you’ve gathered your ingredients. Let’s get to the fun part — making the jam!
Step 1: Prepare the Strawberries
Start by hulling the strawberries—remove the green tops and slice them in halves. I love the vibrant red of strawberries, and slicing them allows them to release their juices more effectively. It’s a simple step, but oh-so-satisfying!
Step 2: Combine Ingredients
In a large, heavy-bottomed pot, toss the halved strawberries with sugar. Let it sit for about 10-15 minutes. This resting period allows the berries to macerate, pulling out their juices and creating a beautiful syrup.
Step 3: Cook the Mixture
Over medium heat, stir the strawberry and sugar mixture. Bring it to a gentle boil, stirring continuously to prevent sticking. You’ll notice the mixture becoming glossy and bubbly. This is where the magic happens; the sugar completely dissolves, and the berries become juicy!
Step 4: Add Lemon and Vanilla
Once boiling, add the fresh lemon juice, lemon zest, and vanilla extract. This is the perfect moment to inhale deeply—it smells divine! Stir well and keep the mixture at a rolling boil for about 10-15 minutes. I like to use a potato masher at this stage if I want a smoother consistency. It’s all about your preference.
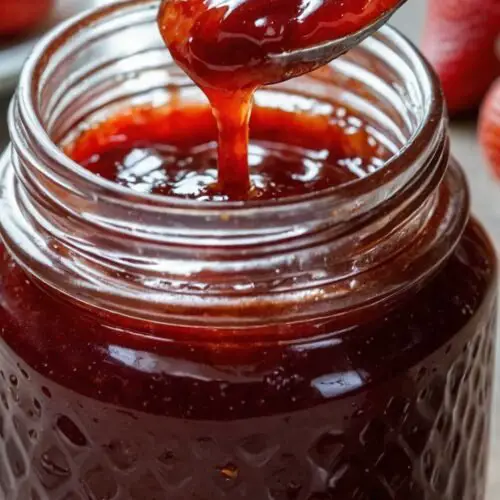
Step 5: Check for Doneness
To check if the jam is ready, place a spoonful on a cold plate. If it holds its shape and you can draw a line through it with your finger, you’re golden! If not, let it boil a bit longer.
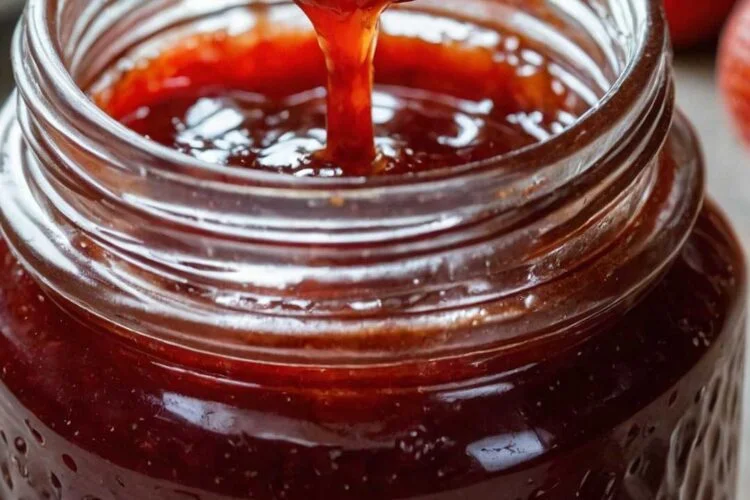
Step 6: Jar it Up
Once done, remove the pot from heat and let it cool slightly. Then, carefully pour the hot jam into clean, sterilized jars. Leave a little headspace at the top—about half an inch. Wipe the rims of the jars for a clean seal, and then screw on the lids.
Step 7: Cool and Store
Let the jars cool completely at room temperature. You can store this jam in the refrigerator for up to three weeks or process it in a hot water bath for long-term storage.

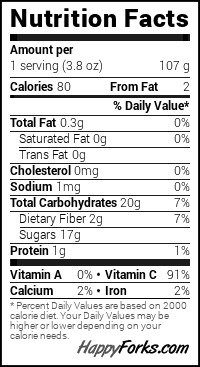
Nutrition Information
Recipe Notes
Let’s dive deeper into some of these key ingredients, as they play essential roles in this jam:
Strawberries: Use ripe, organic strawberries if possible. Their flavor will shine through compared to less-than-fresh options.
Sugar: It not only sweetens but also preserves the berries. You might hear of alternatives, but traditional sugar gives that perfect gel-like texture.
Lemon Juice and Zest: Not just for flavor! The acidity helps to preserve the color and freshness of the jam.
Vanilla Extract: Look for pure extract; imitation versions just don’t offer the same taste.

Recipe Variations
Feeling a bit experimental? Here are some variations that you can try with this strawberry jam recipe:
1. Strawberry-Blueberry Jam: Mix in fresh blueberries for a twist on flavor and color.
2. Spiced Strawberry Jam: Add a pinch of cinnamon or nutmeg for a warm, spiced note.
3. Herbal Strawberry Jam: Infuse a few mint or basil leaves while cooking, and remove them before jarring.
4. Strawberry-Lemonade Jam: Increase the lemon juice and zest for a refreshing twist reminiscent of summertime lemonade.
5. Strawberry-Rhubarb Jam: Combine strawberries with rhubarb for a tart yet sweet jam.
6. Strawberry-Chili Jam: Add a dash of chili flakes to spice things up. This adds a kick and balances the sweetness.
Strawberry Jam Recipe
Equipment
- pot
Ingredients
- 2 lbs 900g fresh strawberries, hulled and sliced in halves
- 1¼ cups 250g fine cane sugar
- 1½ tbsp 22mL fresh lemon juice
- ½ tbsp 8mL pure vanilla extract
- 1 tsp lemon zest
Instructions
- So, you’ve gathered your ingredients. Let’s get to the fun part — making the jam!
Step 1: Prepare the Strawberries
- Start by hulling the strawberries—remove the green tops and slice them in halves. I love the vibrant red of strawberries, and slicing them allows them to release their juices more effectively. It’s a simple step, but oh-so-satisfying!
Step 2: Combine Ingredients
- In a large, heavy-bottomed pot, toss the halved strawberries with sugar. Let it sit for about 10-15 minutes. This resting period allows the berries to macerate, pulling out their juices and creating a beautiful syrup.
Step 3: Cook the Mixture
- Over medium heat, stir the strawberry and sugar mixture. Bring it to a gentle boil, stirring continuously to prevent sticking. You’ll notice the mixture becoming glossy and bubbly. This is where the magic happens; the sugar completely dissolves, and the berries become juicy!
Step 4: Add Lemon and Vanilla
- Once boiling, add the fresh lemon juice, lemon zest, and vanilla extract. This is the perfect moment to inhale deeply—it smells divine! Stir well and keep the mixture at a rolling boil for about 10-15 minutes. I like to use a potato masher at this stage if I want a smoother consistency. It’s all about your preference.
Step 5: Check for Doneness
- To check if the jam is ready, place a spoonful on a cold plate. If it holds its shape and you can draw a line through it with your finger, you’re golden! If not, let it boil a bit longer.
Step 6: Jar it Up
- Once done, remove the pot from heat and let it cool slightly. Then, carefully pour the hot jam into clean, sterilized jars. Leave a little headspace at the top—about half an inch. Wipe the rims of the jars for a clean seal, and then screw on the lids.
Step 7: Cool and Store
- Let the jars cool completely at room temperature. You can store this jam in the refrigerator for up to three weeks or process it in a hot water bath for long-term storage.
Notes
Nutrition
Common Questions
1. How long does homemade strawberry jam last?
When stored in the fridge, this jam can last for about three weeks. If you preserve it using a hot water bath, it can last for up to a year in a cool, dark place.
2. Can I make strawberry jam without sugar?
You can, but the flavor and consistency may change significantly. If you’re looking for alternatives, consider using honey or agave syrup, but keep in mind that these will have different sweetness levels.
3. Is it necessary to sterilize jars?
Yes! Sterilizing jars is crucial to prevent mold and spoilage. You can do this by boiling them in water for about 10 minutes.
4. What if my jam doesn’t set?
If your jam is too runny, you can re-cook it. Just add a bit more sugar and bring it back to a boil. Alternatively, you can thicken it with pectin.
5. Can I use frozen strawberries?
Absolutely! Just ensure they are thawed and drained well before use to avoid excess water in your jam.
6. How do I tell if my jam has gone bad?
Watch for off smells, changes in color, or mold growth. If any of these appear, it’s best to discard the jam.
Conclusion
Making strawberry jam is an incredibly rewarding experience. It allows you to capture the sweetness of summer in each jar. The next time you spread it on your toast or top a dessert with it, you’ll savor not just the flavor but also the memories of creating it. Plus, it makes for a heartwarming gift too! So go ahead—give this recipe a try and enjoy the sweet moments. You’ll find the process straightforward and fun, and I promise, your taste buds will thank you!