
When it comes to bright, zesty desserts that awaken the senses, nothing quite matches the joy of a lemon tart. Paired with whipped cream or fresh berries, this dessert isn’t just a treat — it’s an experience.
It’s like biting into sunshine, with every tangy, sweet morsel sending a jolt of happiness straight to your brain.
So, if you’re ready to dive deep into the world of lemon tarts, let’s embark on this flavorful journey together. I promise, the destination will be sweet.

You’ll Also Like These Recipes
- Rhubarb and Strawberry Crostata Recipe
- Fresh Cherry Compote
- How To Make Poached Pears With Cinnamon at Home
Imagine a warm afternoon, the sun shining down, and the air filled with the sweet scent of citrus. You’re sitting outside, perhaps in your garden or on a cozy patio.
That’s the moment when a slice of lemon tart becomes the star of your day. This classic dessert is celebrated not only for its bright flavor but also for the way it brings people together.
I recall the first time I tried lemon tart. It was at a quaint bakery in Florence. I took one bite, and instantly it was love at first taste. The refreshing acidity of the lemons, combined with the buttery crust, was unforgettable. Since then, I’ve made it my mission to perfect my own lemon tart recipe.
What is Lemon Tart?
Lemon tart is a dessert consisting of a pastry crust filled with a creamy, curd-like filling made primarily from lemon juice, sugar, eggs, and butter. The key to a great lemon tart lies in the balance between the tartness of the lemons and the sweetness of the sugar, creating a bright, zingy flavor that dances on your palate. This dessert can be served chilled and is often adorned with a dusting of powdered sugar or a dollop of whipped cream, adding an extra layer of delight.
Lemon tarts can trace their history back to French cuisine, where they have been enjoyed for centuries.
Some variations include adding herbs or other citrus fruits, but the classic version remains the most beloved. Let’s face it; there’s something undeniably comforting about a well-made lemon tart.
Why You’ll Love This Lemon Tart
Let’s be honest; who wouldn’t love a lemon tart? Here are a few reasons why this dessert stands out:
1. Flavor Explosion: The combination of zesty lemon and creamy filling creates a taste that wakes up your taste buds. It’s refreshing yet sweet, offering the perfect balance.
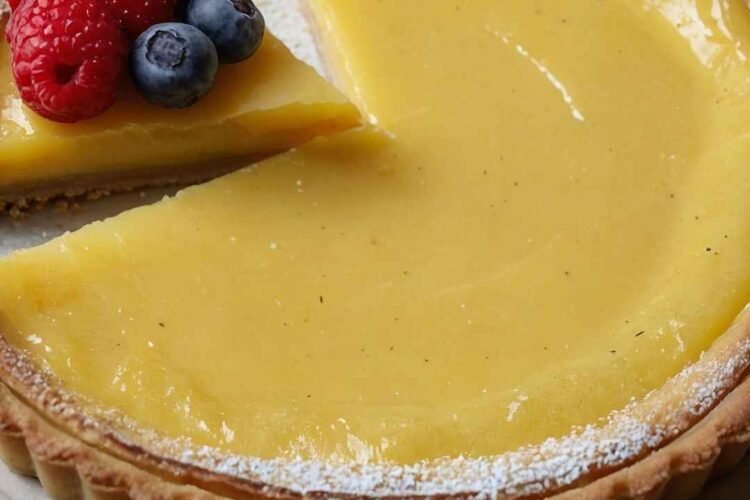
2. Visual Appeal: A beautifully baked lemon tart looks stunning. The bright yellow filling offers a stunning contrast against a golden crust, tempting everyone at the table.
3. Serve It Anytime: Whether for a summer picnic, a holiday gathering, or just a regular weekday dinner, a lemon tart fits right in. It’s versatile enough for any occasion.
4. Make Ahead: One of the best parts? This tart can be made a day or two in advance! It saves time and allows the flavors to meld beautifully.
5. Delightfully Simple: With few ingredients and straightforward steps, this dessert is not just for experienced bakers. It’s accessible, making it an excellent choice for kitchen novices and veterans alike.
The Ingredients You Will Need to Make Lemon Tart
Let’s gather our ingredients and get ready to bake! Here’s what you need:
For the Crust:
- 1 ¼ cups all-purpose flour
- ¼ teaspoon fine salt
- ½ cup chilled butter, cut into small cubes
- 1 large egg yolk
- 2 tablespoons heavy cream
- ¼ cup superfine sugar
- 1 teaspoon vanilla extract
For the Curd:
- ½ cup freshly squeezed lemon juice
- 2 tablespoons freshly grated lemon zest (from 2 lemons)
- 4 large eggs
- 2 large egg yolks
- 1 cup fine sugar
- ½ cup unsalted butter
- 1 tablespoon honey

Directions
Now, let’s get hands-on and make this luscious lemon tart! Follow these steps carefully, and you’ll have a dessert to remember.
Step 1: Prepare the Crust
- Mix Dry Ingredients: In a mixing bowl, whisk together the all-purpose flour, fine salt, and superfine sugar until well combined.
- Incorporate Butter: Add the chilled butter pieces to the dry mixture. Using your fingertips or a pastry cutter, blend until the mixture resembles coarse crumbs. This step is crucial for achieving a flaky crust.
- Add Wet Ingredients: In a separate small bowl, whisk together the egg yolk, heavy cream, and vanilla extract. Pour this mixture into the flour blend and mix until combined. Don’t overhandle; you want just enough to bring it together.
- Chill the Dough: Shape the dough into a disc, wrap it in plastic wrap, and refrigerate for at least 30 minutes. This helps the gluten relax, ensuring a tender crust.
Step 2: Roll Out the Dough
- Preheat Oven: While the dough chills, preheat your oven to 375°F (190°C).
- Roll the Dough: On a lightly floured surface, roll out the dough to fit a 9-inch tart pan. Don’t roll it too thin; about ¼ inch thickness is ideal.
- Fit the Pan: Transfer the rolled dough into the tart pan, pressing it gently into the edges. Trim any excess dough, and use a fork to prick the bottom. This prevents bubbling during baking.
- Blind Bake: Line the crust with parchment paper, fill it with pie weights or dried beans, and bake for about 15-20 minutes until the edges start to turn golden.
Remove the weights and bake for an additional 5 minutes until golden brown. Allow it to cool completely.
Step 3: Prepare the Lemon Curd Filling
- Whisk Eggs: In a medium saucepan, whisk together the large eggs, large egg yolks, and fine sugar until slightly thickened and pale.
- Add Lemons: Stir in the freshly squeezed lemon juice and zest. This will fill your kitchen with a delightful aroma!
- Heat Mixture: Over medium-low heat, add the butter, stirring constantly until it melts and the mixture thickens. This should take about 8-10 minutes. Be cautious not to let it boil; just heat it gently until it coats the back of a spoon.
- Strain and Cool: Remove from heat and strain the mixture through a fine mesh sieve to eliminate any lumps. Let it cool slightly before pouring it into the prepared crust.
Step 4: Bake the Tart
- Bake: Pour the lemon curd into the cooled crust and bake for an additional 20–25 minutes until set but still slightly jiggly in the center. Don’t worry; it will firm up as it cools.
- Cool Completely: Once baked, let the tart cool on a wire rack. After it’s at room temperature, chill in the refrigerator for at least 2 hours.
Notes
Here are some tips to help you achieve the best lemon tart possible:
- Use Fresh Lemons: Fresh lemon juice is key. Bottled juice lacks the vibrant flavor and zest of fresh lemons.
- Don’t Overmix: For a flaky crust, be cautious not to overwork the dough. Mix just until combined.
- Use a Tart Pan: A removable bottom tart pan makes it easier to slice and serve the tart without damaging the crust.
- Temperature Matters: Make sure your butter is cold when making the crust. Cold butter helps create a light, flaky texture.
- Check for Doneness: The filling should not be too firm; a slight jiggle in the center is perfect. It will firm up as it cools.
Storage Tips
If you find yourself with leftover lemon tart (if that’s even possible!), here’s how to keep it fresh:
- Refrigerate: Cover the lemon tart loosely with plastic wrap and refrigerate. It will last up to 3 days.
- Freeze Individual Slices: For longer storage, you can freeze individual slices. Wrap them in plastic wrap and then in aluminum foil. They’ll keep in the freezer for up to 2 months.
Nutrition Information
Lemon tart recipe nutrition facts

Serving Suggestions
Looking to elevate your lemon tart experience? Here are some delicious ways to serve it:
- Whipped Cream: Top each slice with fresh whipped cream. The creaminess complements the tartness beautifully.
- Fresh Berries: Pair with seasonal berries, such as raspberries or blueberries. Their natural sweetness enhances the tart’s flavors.
- Mint Garnish: Add a sprig of fresh mint on top for a pop of color and a refreshing burst.
- Icing Sugar: Dust with powdered sugar before serving for a charming presentation and a touch of sweetness.
- Lemon Zest: Finish with a sprinkle of lemon zest to intensify the citrus flavor, giving it an extra zing.

What Other Substitutes Can I Use in Lemon Tart?
Looking to experiment with your lemon tart? Here are some fantastic substitutes you can consider:
- Lime Juice: Use lime juice instead of lemon for a different citrus twist. The tartness of lime adds a unique flavor.
- Orange Zest: Incorporate orange zest for a subtle sweetness. Combine it with lemon for a citrus blend that’s divine.
- Coconut Oil: For a dairy-free option, replace butter in the crust with coconut oil. This gives a lovely flavor and texture.
- Honey: You can reduce refined sugar by substituting part with honey. Just remember, honey is sweeter, so adjust accordingly.
- Vegan Alternatives: Use a flax egg or chia seed egg for the filling to make it vegan! Use plant-based butter instead of regular butter in the crust.

The Perfect Lemon Tart
Equipment
- saucepan
Ingredients
For the Crust:
- 1 ¼ cups all-purpose flour
- ¼ teaspoon fine salt
- ½ cup chilled butter cut into small cubes
- 1 large egg yolk
- 2 tablespoons heavy cream
- ¼ cup superfine sugar
- 1 teaspoon vanilla extract
For the Curd:
- ½ cup freshly squeezed lemon juice
- 2 tablespoons freshly grated lemon zest from 2 lemons
- 4 large eggs
- 2 large egg yolks
- 1 cup fine sugar
- ½ cup unsalted butter
- 1 tablespoon honey
Instructions
Step 1: Prepare the Crust
- Mix Dry Ingredients: In a mixing bowl, whisk together the all-purpose flour, fine salt, and superfine sugar until well combined.
- Incorporate Butter: Add the chilled butter pieces to the dry mixture. Using your fingertips or a pastry cutter, blend until the mixture resembles coarse crumbs. This step is crucial for achieving a flaky crust.
- Add Wet Ingredients: In a separate small bowl, whisk together the egg yolk, heavy cream, and vanilla extract. Pour this mixture into the flour blend and mix until combined. Don’t overhandle; you want just enough to bring it together.
- Chill the Dough: Shape the dough into a disc, wrap it in plastic wrap, and refrigerate for at least 30 minutes. This helps the gluten relax, ensuring a tender crust.
Step 2: Roll Out the Dough
- Preheat Oven: While the dough chills, preheat your oven to 375°F (190°C).
- Roll the Dough: On a lightly floured surface, roll out the dough to fit a 9-inch tart pan. Don’t roll it too thin; about ¼ inch thickness is ideal.
- Fit the Pan: Transfer the rolled dough into the tart pan, pressing it gently into the edges. Trim any excess dough, and use a fork to prick the bottom. This prevents bubbling during baking.
- Blind Bake: Line the crust with parchment paper, fill it with pie weights or dried beans, and bake for about 15-20 minutes until the edges start to turn golden.
- Remove the weights and bake for an additional 5 minutes until golden brown. Allow it to cool completely.
Step 3: Prepare the Lemon Curd Filling
- Whisk Eggs: In a medium saucepan, whisk together the large eggs, large egg yolks, and fine sugar until slightly thickened and pale.
- Add Lemons: Stir in the freshly squeezed lemon juice and zest. This will fill your kitchen with a delightful aroma!
- Heat Mixture: Over medium-low heat, add the butter, stirring constantly until it melts and the mixture thickens. This should take about 8-10 minutes. Be cautious not to let it boil; just heat it gently until it coats the back of a spoon.
- Strain and Cool: Remove from heat and strain the mixture through a fine mesh sieve to eliminate any lumps. Let it cool slightly before pouring it into the prepared crust.
Step 4: Bake the Tart
- Bake: Pour the lemon curd into the cooled crust and bake for an additional 20–25 minutes until set but still slightly jiggly in the center. Don’t worry; it will firm up as it cools.
- Cool Completely: Once baked, let the tart cool on a wire rack. After it’s at room temperature, chill in the refrigerator for at least 2 hours.
Notes
- Use Fresh Lemons: Fresh lemon juice is key. Bottled juice lacks the vibrant flavor and zest of fresh lemons.
- Don’t Overmix: For a flaky crust, be cautious not to overwork the dough. Mix just until combined.
- Use a Tart Pan: A removable bottom tart pan makes it easier to slice and serve the tart without damaging the crust.
- Temperature Matters: Make sure your butter is cold when making the crust. Cold butter helps create a light, flaky texture.
- Check for Doneness: The filling should not be too firm; a slight jiggle in the center is perfect. It will firm up as it cools.
Nutrition
Frequently Asked Question
1. Can I make the crust ahead of time?
Absolutely! You can prepare the crust a day in advance. After rolling out and shaping it, wrap it tightly and refrigerate it. Just remember to blind bake it on the day you plan to serve the tart.
2. My curd is too runny. What went wrong?
This could happen if it wasn’t cooked long enough or if the heat was too low. Ensure that you cook the curd until it’s thick enough to coat a spoon. It should be slightly runny but will set as it cools.
3. Can I use different fruits for the tart filling?
Yes! While lemon is the star, you can experiment with other fruits, such as lime, orange, or even berries. Just adjust the sugar based on the fruit’s natural sweetness.
4. How do I know when the tart is done baking?
Your lemon tart is done when it’s set around the edges but still has a slight jiggle in the center. It will firm up as it cools, so don’t worry if it’s not completely solid when you take it out of the oven.
5. Can lemon tart be frozen?
Yes, you can freeze lemon tart! Wrap it tightly in plastic wrap and aluminum foil. It’ll keep in the freezer for up to two months. Thaw it in the refrigerator when you’re ready to enjoy.
6. What should I do if my crust shrinks during baking?
Crust shrinkage can happen if the dough is overworked or if it’s not chilled long enough. Ensure you allow the dough to rest adequately and refrain from rolling it too thin.
Conclusion
Making a lemon tart is not just about creating a dessert; it’s about crafting an experience. This simple yet delightful treat captures the essence of summer and happiness in every bite. As I mentioned earlier, it connects people and creates moments worth cherishing.
So, whether you enjoy it as a special treat or share it with loved ones, this lemon tart recipe is bound to be a hit.
Now, roll up your sleeves, gather those ingredients, and get ready to whisk up some magic in your kitchen. With each step, you’re crafting something truly delicious.
Trust me, your taste buds will thank you! Now, who feels like a slice of sunshine?