
Before diving into the lusciousness of easy crème brûlée, it’s good to know what pairs well with this classic dessert. The velvety custard and caramelized sugar layer can be beautifully complemented by various sides.
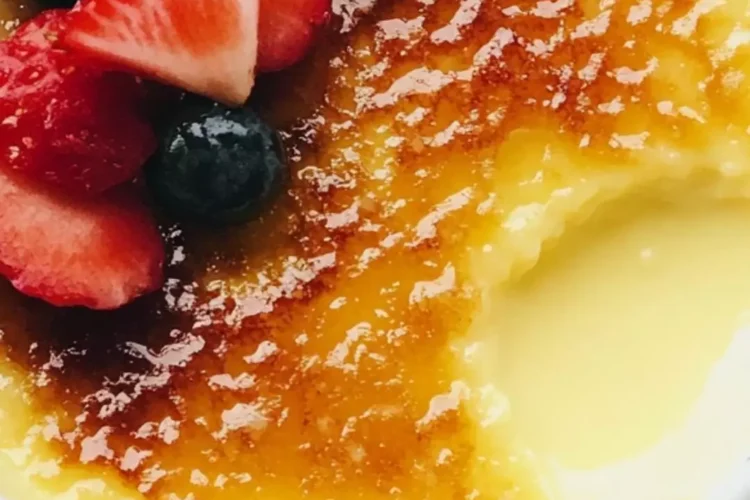
I find that fresh berries—like tart raspberries or sweet strawberries—add a refreshing contrast. A scoop of tangy lemon sorbet is another excellent match, cutting through the richness.
A light espresso or a glass of dessert wine, such as a sweet Sauternes, can make the indulgence even more enticing. For a truly memorable presentation, serve it with a sprinkling of pistachios or a drizzle of honey.

Let’s face it; crème brûlée is like a hug on a plate. If you’ve ever enjoyed that moment as the spoon cracks through the crispy caramelized top to reveal the creamy custard underneath, then you understand this dessert is more than just sweet.
It’s an experience. I’ll be honest. Making crème brûlée has always seemed daunting to me. It sounded sophisticated, with all the talk of water baths and precise temperatures. But over the years, I’ve developed a way to make it a little easier while still retaining all that delightful character.
This easy crème brûlée recipe offers all the luxury with a fraction of the effort. Let’s unwrap this sweet surprise together!
What is Easy Crème Brûlée?
At its core, crème brûlée is a simple dessert made of cream, sugar, and egg yolks, finished with a hard sugar crust. Traditionally, it’s cooked slowly in a water bath to achieve a silky texture. The name itself is French, literally translating to “burnt cream.”
The “burnt” refers to that delicious caramelized sugar layer that, when torched, creates a contrast in both texture and flavor. Easy crème brûlée, as I have come to love, strips away the intimidation factor without sacrificing taste, texture, or style.
What Makes This Recipe Different from Other Easy Crème Brûlée Recipes?
I’ve scoured countless recipes, dissected them, and even tried a few. What I found often was a list of complex instructions or elusive ingredients. My recipe stands out with its straightforward approach while still drawing on quality.
First off, it opts for rich whipping cream for unparalleled creaminess, and I’ve added honey to deepen the flavor profile. This twist keeps it light and adds a hint of natural sweetness without making the dish feel heavy.
Also, I’ve mastered a few techniques that make for less fuss, which means you can spend more time enjoying your life and less time fretting in the kitchen.
How Does It Taste?
Get ready for a delightful balance of flavors. The first bite transports you to a little café in Paris (even if you’re sitting at your kitchen table). The creaminess envelops your tongue, with the natural sweetness of the sugar and the hint of vanilla dancing in harmony.
As your spoon breaks through the caramel top, that satisfying crack releases a sweet, slightly bitter aroma that’s just downright heavenly. If you sprinkle a few berries or add a touch of zesty whipped cream on top, consider it a fiesta for your taste buds.
Ingredients You’ll Need To Make This Dish
Here’s the rundown of what you need to create this masterpiece. Most of these ingredients are probably in your pantry already!
- 4 large egg yolks
- 1/3 cup of fine sugar
- 1 tablespoon of honey
- 2 cups of rich whipping cream
- 1 teaspoon of pure vanilla extract
- A pinch of sea salt
- 1/4 cup of powdered sugar

Step-by-Step Instructions
Let’s dive into the process of creating this tasteful delight. Grab your whisk and let’s get to work!
Step 1: Preheat Your Oven
Preheat your oven to 325°F (about 160°C). Starting with the right temperature is crucial to getting the texture just right.
Step 2: Prepare the Ramekins
Place four ramekins into a large baking dish. This will help with the water bath later!
Step 3: Whisk the Egg Yolks and Sugar
In a mixing bowl, whisk together 4 large egg yolks and 1/3 cup of fine sugar until the mixture is pale and slightly thick. This will ensure that your custard has a smooth texture without any graininess. Add in that delectable 1 tablespoon of honey during this stage, and whisk until fully blended.
Step 4: Heat the Cream
In a saucepan over medium heat, combine 2 cups of rich whipping cream, 1 teaspoon of pure vanilla extract, and a pinch of sea salt. Allow it to heat until it’s steaming but not boiling. This helps to release the vanilla flavor.
Step 5: Combine Mixtures
Slowly pour the hot cream mixture into the bowl with your egg yolks while continuously whisking. The key here is to temper the egg yolks slowly with the hot cream to avoid curdling. You’ll see this creamy mixture come to life.
Step 6: Pour into Ramekins
Carefully pour the custard mixture into each of the ramekins, ensuring an even distribution.
Step 7: Prepare the Water Bath
Fill the baking dish with hot water until it reaches halfway up the sides of the ramekins. This water bath will help cook the custard evenly and prevent any curdled textures.
Step 8: Bake
Slide the baking dish into the preheated oven and bake for about 30-35 minutes, or until the edges are set but the centers are still slightly jiggly.
Step 9: Cool and Chill
Once baked, remove the ramekins from the water bath and let them cool for a moment. After they cool slightly, transfer them to the fridge for at least 2 hours, or until completely chilled.
Step 10: Caramelize
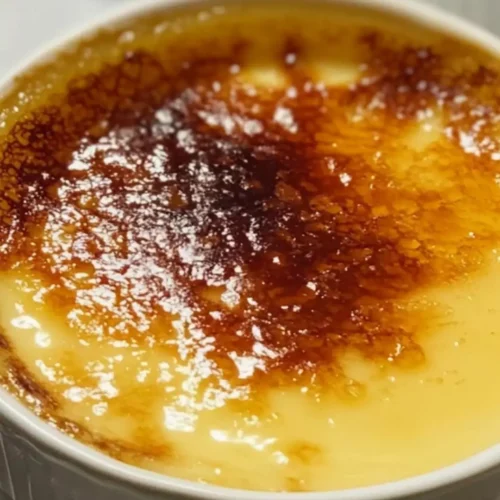
Just before serving, take the chilled crème brûlée out of the fridge. Sprinkle about 1 tablespoon of powdered sugar evenly on top of each custard.
Using a kitchen torch, carefully caramelize the sugar until it turns to a beautiful golden brown. If you don’t have a torch, you can broil them in the oven for a few minutes—watching closely to prevent burning.
Step 11: Serve and Enjoy!
Let the sugar cool for a minute, then serve your magnificent easy crème brûlée with a selection of berries or your favorite toppings!
Tips & Tricks on Making Easy Crème Brûlée
Creating the perfect crème brûlée can be simple with these quick pointers:
- Chill Thoroughly: Make sure your custards are well-chilled before caramelizing the sugar. This sets the custard and creates a perfect contrast to the warm toffee.
- Control the Heat: When caramelizing, use medium heat. Too much heat can burn the sugar and create a bitter taste.
- Experiment with Flavors: For a twist, try infusing the cream with flavors like orange zest or espresso during heating for unique variations.
- Use Quality Ingredients: The flavor of this dish relies heavily on the quality of cream and vanilla. When it’s simple, quality matters.
- Don’t Skip the Salt: Just a pinch of salt enhances sweetness and keeps the balance interesting.

How Do I Store This Dish?
Now that you’ve conquered crème brûlée, it’s important to know how to store it properly. You can keep the custard in the fridge for up to 2-3 days without the sugar topping.
Cover each ramekin with plastic wrap. When you’re ready to serve, simply torch the sugar layer for that perfect caramelized touch.
What Other Substitutes Can You Use in Easy Crème Brûlée?
Sometimes, a little experimentation can lead to team discovering fabulous alternatives. Here are some ideas to switch things up:
- Coconut Milk instead of Cream: For a dairy-free version, use full-fat coconut milk. It gives a distinct coconut flavor and is delightfully creamy.
- Maple Syrup instead of Honey: If you prefer the flavor profile of maple, go ahead and substitute honey for maple syrup for a unique taste.
- Almond Extract for Vanilla: Swap vanilla extract for almond extract if you want to explore a different flavor direction. A little goes a long way!
- Stevia or Monk Fruit Sweetener for Sugar: For a lower-calorie version, consider these sweeteners. Follow the equivalent weight for your preferred sweetener.
- Dark Brown Sugar for Regular Sugar: This will impart a richer, more complex flavor to the brulee, enhancing the overall experience.
Easy Creme Brulee Recipe
Equipment
- Oven
Ingredients
- 4 large egg yolks
- 1/3 cup of fine sugar
- 1 tablespoon of honey
- 2 cups of rich whipping cream
- 1 teaspoon of pure vanilla extract
- A pinch of sea salt
- 1/4 cup of powdered sugar
Instructions
- Preheat your oven to 325°F (about 160°C). Starting with the right temperature is crucial to getting the texture just right.
- Place four ramekins into a large baking dish. This will help with the water bath later!
- In a mixing bowl, whisk together 4 large egg yolks and 1/3 cup of fine sugar until the mixture is pale and slightly thick. This will ensure that your custard has a smooth texture without any graininess. Add in that delectable 1 tablespoon of honey during this stage, and whisk until fully blended.
- In a saucepan over medium heat, combine 2 cups of rich whipping cream, 1 teaspoon of pure vanilla extract, and a pinch of sea salt. Allow it to heat until it’s steaming but not boiling. This helps to release the vanilla flavor.
- Slowly pour the hot cream mixture into the bowl with your egg yolks while continuously whisking. The key here is to temper the egg yolks slowly with the hot cream to avoid curdling. You’ll see this creamy mixture come to life.
- Carefully pour the custard mixture into each of the ramekins, ensuring an even distribution.
- Fill the baking dish with hot water until it reaches halfway up the sides of the ramekins. This water bath will help cook the custard evenly and prevent any curdled textures.
- Slide the baking dish into the preheated oven and bake for about 30-35 minutes, or until the edges are set but the centers are still slightly jiggly.
- Once baked, remove the ramekins from the water bath and let them cool for a moment. After they cool slightly, transfer them to the fridge for at least 2 hours, or until completely chilled.
- Just before serving, take the chilled crème brûlée out of the fridge. Sprinkle about 1 tablespoon of powdered sugar evenly on top of each custard.
- Using a kitchen torch, carefully caramelize the sugar until it turns to a beautiful golden brown. If you don’t have a torch, you can broil them in the oven for a few minutes—watching closely to prevent burning.
- Let the sugar cool for a minute, then serve your magnificent easy crème brûlée with a selection of berries or your favorite toppings!
Notes
- Chill Thoroughly: Make sure your custards are well-chilled before caramelizing the sugar. This sets the custard and creates a perfect contrast to the warm toffee.
- Control the Heat: When caramelizing, use medium heat. Too much heat can burn the sugar and create a bitter taste.
- Experiment with Flavors: For a twist, try infusing the cream with flavors like orange zest or espresso during heating for unique variations.
- Use Quality Ingredients: The flavor of this dish relies heavily on the quality of cream and vanilla. When it’s simple, quality matters.
- Don’t Skip the Salt: Just a pinch of salt enhances sweetness and keeps the balance interesting.
Nutrition
Frequently Asked Questions
Conclusion
There you have it—my journey in creating this easy crème brûlée that’s rich and satisfying without the complexities of traditional methods. This simple twist on a classic brings decadence into your kitchen without the drama.
So gather your supplies, muster up some courage, and give this recipe a try. You might just find this dessert moving to the top of your favorites list! Prepare to enjoy the satisfactions not just of cooking, but of sharing your creation with friends and family.
There’s nothing quite like the joy of serving something that will leave people smiling and coming back for seconds. Bon appétit!